Structuring tabletop work: How to use START and FINISHED boxes
Jan 23, 2020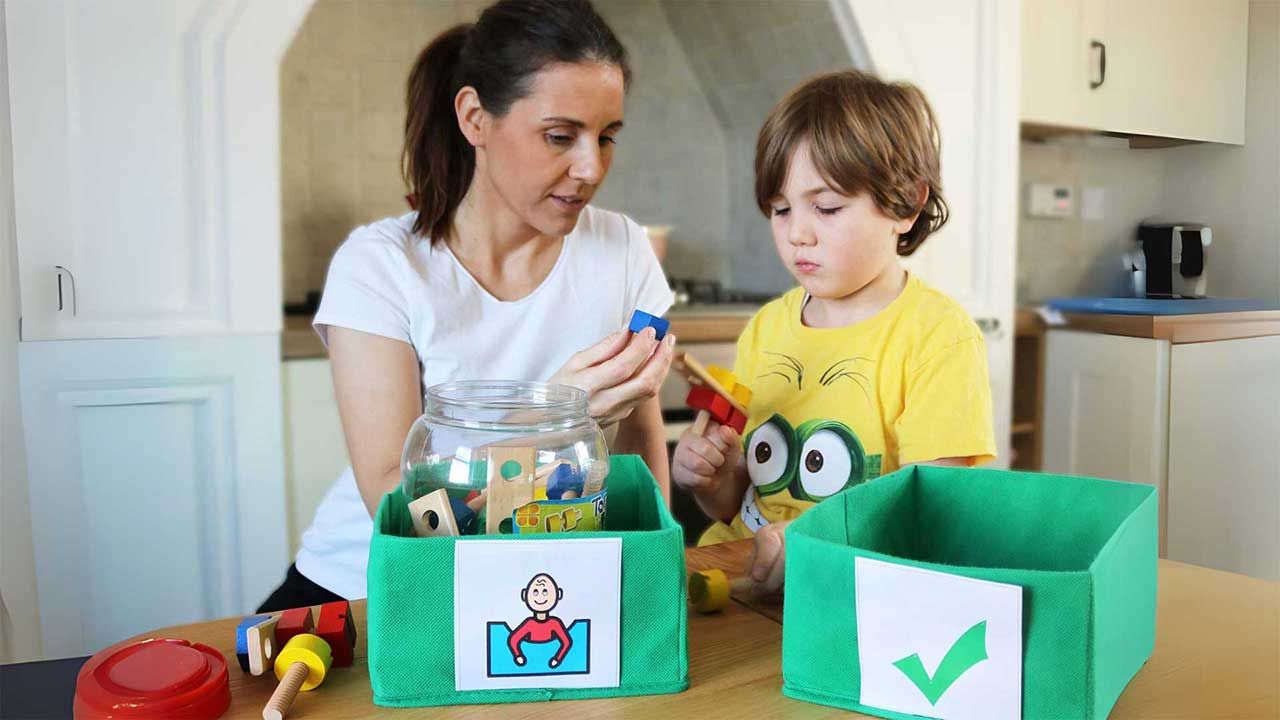
I would also like to introduce you to a really useful resource that I use with my young students, and that I used with my own son Sebastian during his preschool years.
Children with autism and other developmental disabilities benefit hugely from routines and structure. Some children particularly enjoy taking part in structured activities, and today I’ll describe how to structure a work session. You can use this technique to structure a play or teaching session at home and in the classroom. The technique is called the START and FINISHED boxes.
Structuring tabletop work: How to use START and FINISHED boxes.
1. Find two boxes – one for START and the other for FINISHED. They can be two different colours or you can print a symbol for start and finished on them. What’s important is that you consistently use the same boxes for START and FINISHED.
2. Before you start, select a designated work area where there are limited distractions. I usually position a small table in a quiet corner and have the child facing me. Always use the same table and location for the structured work sessions.
3. Place the START box to the left of the table, and the FINISHED box to the right of the table and always encourage the child to work from left to right. You are teaching your student that the activities have a start, a middle and an end.
4. Put a few toys/activities in the START box. I normally start with two activities that the child likes. Take one activity out, complete it, and put it in the FINISHED box. Do the same with the other. When the START box is empty, praise your student for the great work they have done and give them a reward, like a sticker or allow them to play with a favourite toy.
Some children have difficulty organising and planning, so this technique shows them that there is a clear start and finish to the task and provides the structure they need to complete the work successfully. Providing a START and FINISHED box allows a child to see what work has to be done, how much has to be done (they will see that there are 2 or 3 activities to be done in the START box) and when the tabletop work will end (when all the activities are in the finished box). By using this method you are making their work time organised, predictable and very visual.
If your student struggles with this technique, review the activities and make sure that you use tasks that are enjoyable and are easy to complete. Wait until a child learns how to use the START and FINISH boxes before you introduce new activities.
Over time, gradually increase the number of activities that your student can do during a session. I normally mix the type of activities in the START box. I tend to start with easier activities, do the more challenging ones in the middle, and finish with a fun task.
As children progress, reduce the amount of help you provide. Allow your student to do some of the tasks independently and supervise from a distance when possible.
Did you find this article helpful? If so, please share it with a colleague that you think would enjoy it!